An Awesome Guide to Facebook Advertising
Social media has quickly become an incredible way to advertise your business, connect with new prospects, and drive leads to your site. Facebook has evolved to become one of the most popular and most affordable advertising options out there.
This article covers everything you need to do to get your first Facebook advertising campaign up and running. When you’re just getting started Facebook advertising can seem little complex and overwhelming. However, once you create a few ad campaigns you’ll be amazed at what you can accomplish.
Below we cover everything you need to know about setting up your account, choosing the best kind of ad campaign for your needs, using the Facebook Pixel, and getting started with custom audience types.
Why Use Facebook Ads?
Facebook advertising is one of the most effective methods for growing your business, increasing your online audience, and generating a steady stream of leads, or sales for your business. With over 1 billion monthly active users the chances are high that your ideal audience is using the platform on a daily basis.
Plus, the targeting options for Facebook are quite advanced. You can easily target by things like age, gender, demographics, interests, and much more. We’ll get into more advanced targeting options below.
Facebook advertising campaigns are also very easy to track, can quickly provide you with relevant traffic, and offer you detailed options for controlling your overall budget and cost-per-click.
However, your ad campaigns do need to be managed correctly. If your ad campaign is managed the wrong way you can end up spending much more than you intended. The targeting options are also better suited for the B2C market, businesses operating in the B2B market would be better served with a different advertising platform.
Getting Started
If you haven’t done any Facebook advertising before, then you’ll need to create an account. First, navigate to the Facebook Ads Manager.
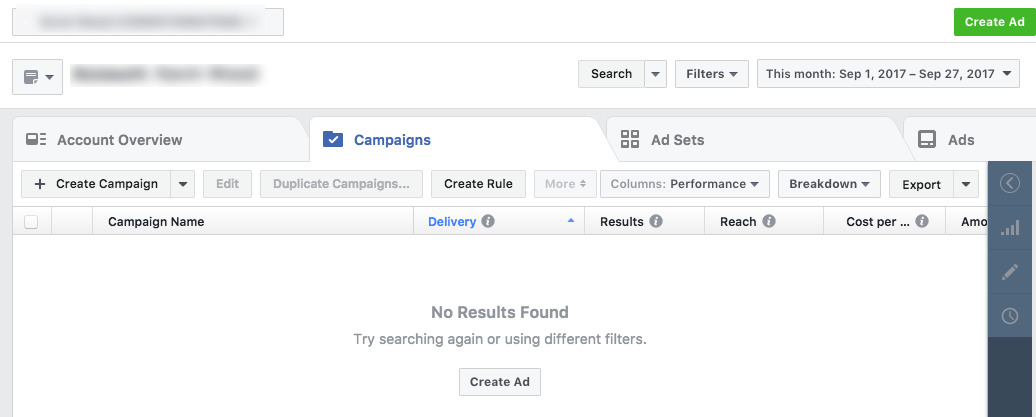
This will take you to the ad dashboard. It’s important to get comfortable within your Facebook advertising dashboard, as this is where you’ll be spending a lot of time.
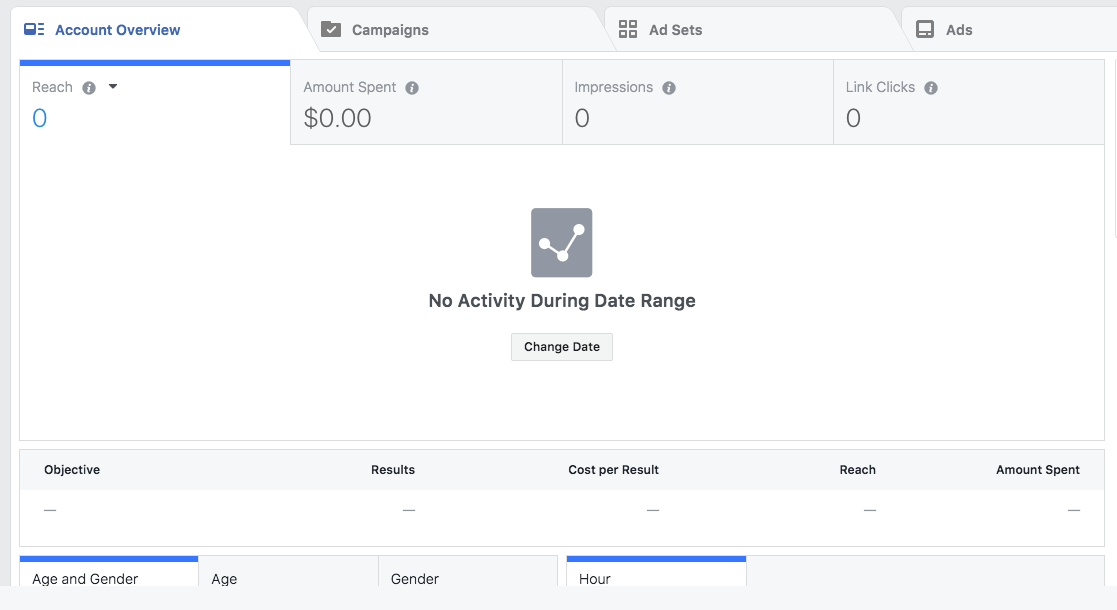
From your dashboard you’ll be able to create ads, look at the stats of your last 7 days, filter out ads, view all of your past and current campaigns, monitor your spending, and more.
Facebook Ad Breakdown
Facebook ads offer you an incredibly versatile ad selection. Currently, there are 11 different ad variations that you can choose from to meet your advertising needs.
We break them down below:
1. Boosting Your Posts
If you currently have a Facebook page you’ll be able to boost your posts to improve your engagement levels, likes, comments, shares and more.
To boost your post just select your Facebook page, select the post you’d like to boost, and name your campaign. Then, you’ll set the budget and schedule, preview your ad and you’re all set!
2. Sending Traffic to Your Site
If you’re looking to improve website traffic, then this is a great ad option for you. Create a new ad and select the ‘Traffic’ option. After you name your campaign you’ll visit a screen that lets you customize where you’d like to send traffic to (a website, app, or to messenger), select your audience, set your budget and ad placements, and finally start customizing your ad.
You’ll also have the ability to choose from images, carousel images, and video. Plus, you’ll be able to change your description, headline, and CTA.
3. Improving Your Conversions
In order to use this option you’ll want to make sure the Facebook Pixel is installed and active. Just select the ‘Conversions’ option, name your campaign, enter the URL of your page, and choose the right conversion Pixel.
You’ll have similar ad customization options as the option above.
4. Promoting Your Page
Promoting your page is a good idea if you’re looking to improve overall awareness and improve the total number of likes to your page. This process is quite simple as well, just select the ‘Reach’ option, name your campaign, select your audience and budget, then you’ll start creating the ad.
You’ll be able to optimize your image, text, clickable elements, and more. You can even create different versions of the same ad and rotate the ad to see which performs the best.
You can also customize the location where your visitors end up after clicking through, for example your timeline, your videos, photos, and more.
5. Increase App Installs
If you have an app, then you’re probably looking for ways to improve its reach. If this sounds like you, then you’ll want to use the ‘App installs’ option.
For this you’ll want to choose your app from the iOS or Google Play store, and give your campaign a name. You’ll have the similar customization options as above, but there are a few crucial differences:
- Only have your ads show on mobile websites and apps.
- Use deep links to link to specific screens within your app.
- A variety of different CTA buttons, like Learn More, Use App, Play Game, and more.
6. Increase Engagement
With this ad you’ll be trying to improve engagement within a post or page. This includes things like more comments, likes, shares, event likes, and even people claiming offers.
To use this option select ‘Engagement’, name your campaign, and specify if you want to improve post engagement, page likes, or responses to events. The option you choose will determine the customization options you’re given. But, overall the setup is very similar to any of the ads types highlighted above.
7. Reach Local Buyers
If you’re a local business, then you’ll want to advertise to people based in your local area. Just select the ‘Store visits’ option, name your campaign, select your Facebook page, define your audience and budgets, and start building your ad.
In order to target local buyers you’ll be given a map where you’ll select your local area and choose anywhere from a 1 to 50 mile radius.
You’ll have different action options based upon what you want your audience to do. For instance, you can have them like your page, call your business, send you a Facebook message, learn about your business, and more.
8. Improve Messenger Messages
Messenger messages can be a great way to interact with your potential customers and even drive sales. It can even be used to offer support for your business. To use this ad select the ‘Messages’ option, name your campaign, define your audience and budgets, and start customizing your ad.
9. Collect Leads For Your Business
If you’re looking for new customers, then this is a great ad choice for you. You’ll be selecting the ‘Lead generation’ option, naming your campaign, selecting your Facebook page, defining your audience and budget, placements, and finally creating your ad.
The ad creative is similar, but on the lead form you’ll be choosing different buttons like, Download, Learn More, Get a Quote, Subscribe, Sign Up, and more.
Next, you’ll be creating a lead form that will collect the user data. There are over 15 different lead data options you can include.
Finally, you can also include Context Cards. These give your visitors more information about your offer before they decide to take action.
10. Push Product Sales
If you run an eCommerce store, then this type of ad will be useful. Just select the ‘Product catalog sales’ option. You’ll be able to automatically show products that you’ve uploaded to your product catalog to your targeted audience. So, make sure you’ve created a product catalog before you start creating this ad type.
You’ll go through the similar process as above of naming your campaign, defining your audience and budget, placements, specifying what products you want to promote, and creating your ads.
11. Get Video Views
Video is huge on Facebook right now. To showcase current reviews select the ‘Video views’ option, name your campaign, set your audience and budget, and start customizing your ad.
Next, you’ll upload your video, or a series of images that will autoplay as a video. You’ll be able to edit the appearance of the video and add buttons to your ad. Typically, video ads are used to encourage likes, but you can customize the button text if you’d like.
12. Improve Overall Brand Awareness
Sometimes you want to expose your business to a wider audience. This is one of the least goal oriented campaign objectives, but can still be useful to some business owners. To use this option select the ‘Brand awareness option’, name your campaign, set your audience, budget, and ad placements, then start building your ad.
Setting Up Your Facebook Ad Campaign
Now that you have an understanding of the types of ads you can create and the benefits you can see for your business it’s time to start creating your very first Facebook ad. The process below will walk you through the ins and outs of getting your ad setup.
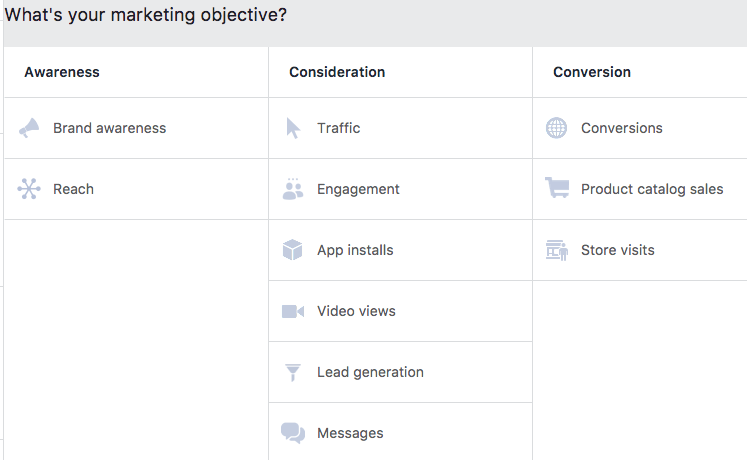
1. Set Your Campaign Objective
The three main methods you’ll have of setting up your ad are the Boost posts, create ads with the Ad Editor, or use the Power Editor tool. The Power Editor tool can get quite complex, so the easiest options for beginners are probably the first two. But, for the sake of keeping things simple we’re going to focus on using the Ad Editor to create your ad.
First, you’ll want to navigate to your Facebook Ads Manager. Then, click on green “Create Ad” button in the top right corner, or the “Create Ad” button in the center of your dashboard.
This will bring up a series of marketing objectives (profiled above) which will determine the course of your ad creation.
For this example we’re going to select the ‘Traffic’ option.
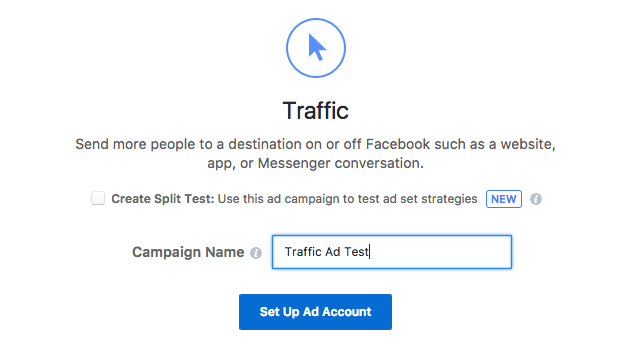
Then, name your campaign, and click on the blue button that says “Set Up Ad Account”.
2. Select Your Targeted Audience
With your ad type chosen it’s time to choose who we’re going to be targeting with our ads and how much we want to spend.
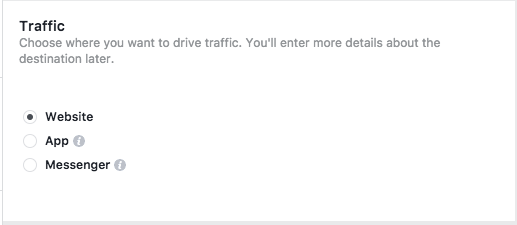
For the destination we’re going to select a website, but you have the ability to send traffic to an app, or your messenger as well.
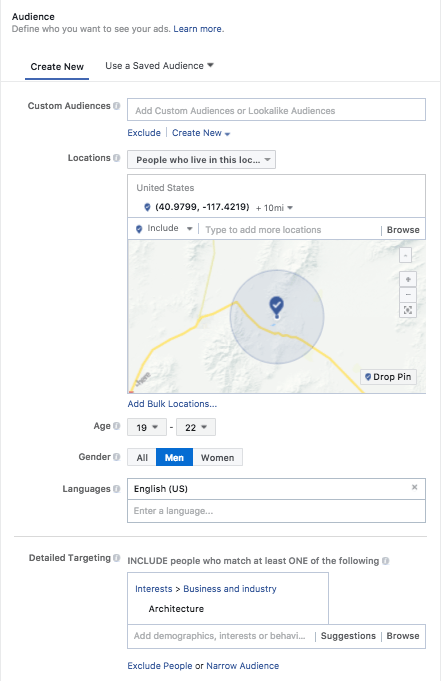
When defining your audience you can use the options below like location, age, gender, demographics, and connections. Or, you can create an in-depth custom audience to use. We offer an entire section below on creating custom audience types.
For this tutorial we’re just going to make a few simple audience adjustments.
Once you’re happy with your audience selection click on ‘Save this Audience’.
3. Set Your Budget and Ad Schedule
Now, we’re going to set how much we’d like to spend on our ads. You can select either a daily or lifetime budget, along with the dates you’d like your ad to run.
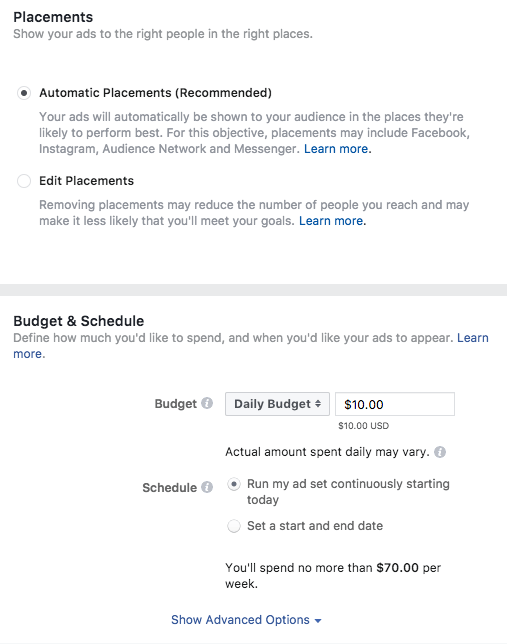
Then, click on ‘Continue’ and we’ll start designing our ads.
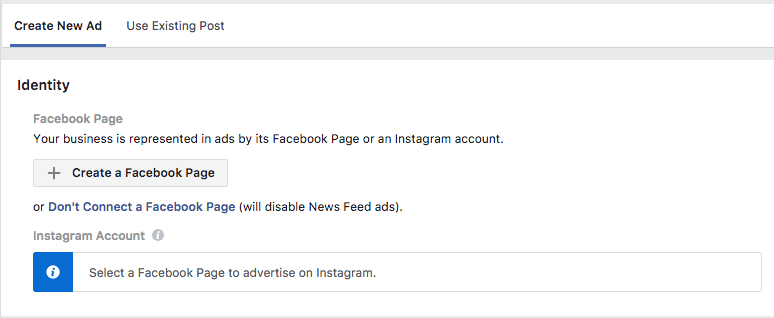
4. Design Your Ads
For designing your ad you’ll either create an ad from scratch, or use a post that you’ve already published on your Facebook page.
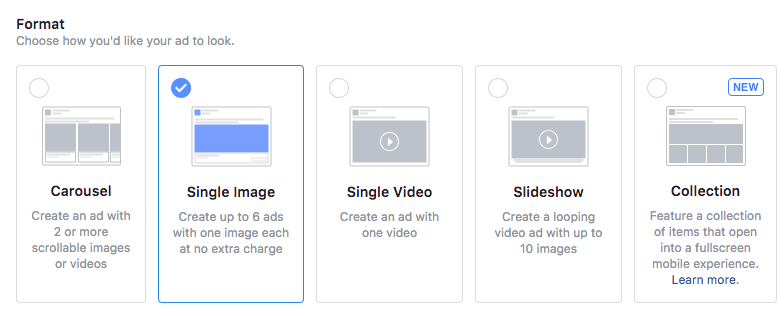
You can also choose whether you want to use a single image or video, or an image carousel that rotates up to 5 different images. Using just a single image is probably the easiest paths for beginners. You can also upload up to 6 different images, which will cycle through so you can see which image performs the best.
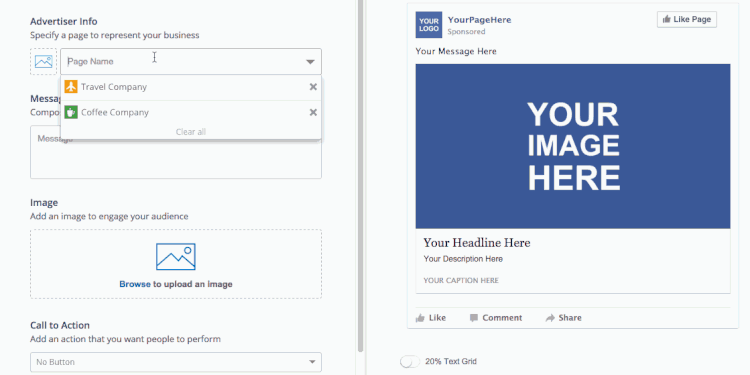
Now, it’s time to add your text, headline, and your CTA button. You can also choose where you want your ads to show up, including Facebook, Facebook mobile, and Instagram.
Once you’ve entered your text you can preview your ad to make sure it’s exactly how you’d like it. You can also use the ad mockup tool from Ad Parlor, which makes it really easy to preview your ads. It’s pretty bad ass!
With your ad creative finished you can select the exact places you want your ads to appear. You can choose between the Mobile News Feed, Instagram, Audience Network, and Desktop Right Column.
Then, click on ‘Confirm’. Congratulations, your Facebook advertising campaign is now live.
What is the Facebook Pixel?
The Facebook Pixel is a little piece of code you add to your website that will help you do things like, track your conversions, better optimize your ads, and remarketing to people who have already interacted with you in some form.
Facebook Pixel Benefits
The Facebook Pixel is a relatively new development. The goal of the pixel is to help you run more effective advertising campaigns and refine your existing advertising efforts. Below we look at the main features using the Pixel will provide you with.
1. The Ability to Track Conversions
The more information you’re able to gather about your audience the more effective ad campaigns you’ll be able to run. With conversion tracking you’ll be able to gather data about how people actually engage and interact with your website once they’ve viewed your ad. This will help you gather crucial optimization data.
Plus, you’ll be able to track people across different devices as well. So, if they view your ad on a mobile device, but they use their desktop browser to make a purchase, you’ll be able to create more effective ads in the future.
2. Run More Effective Ads
To get a better ROI from your Facebook ads you’ll need to improve the quality of your ads and the audience targeting. With the data, the Pixel gives, you’ll be able to do just that.
With the Pixel, you’ll be able to track which ads are the most effective. Plus, you’ll be able to see how different ads cause visitors to take different actions.
3. Create Lookalike Audiences
If you already have your core audience defined, then you’ll be able to build lookalike audiences that share similar characteristics with that existing audience. This will allow you to expand your existing customer base, while still ensuring they’re similar to your existing customers.
4. Use Ad Retargeting
Ad retargeting is the process of marketing to people who have already engaged with your website in some form. These people already know about you, so you’ll have to market to them in a different fashion.
The Pixel has a variety of different events that specify different user actions you can track and optimize your ads for.
How to Use the Facebook Pixel
With the Pixel, you’ll rely on two different kinds of events to track and optimize around. The first is called standard events, and the second is called custom conversions.
Standard Events
Pixel is automatically equipped with a few different standard events you can track. The standard events are as follows:
- Search: someone uses your site’s search function.
- Add to cart: someone adds a product to their cart.
- Add to wishlist: someone adds one of your products to a wishlist.
- View content: someone visits a page on your website.
- Checkout: someone starts the checkout process on your site.
- Adding payment information: someone enters their payment information.
- Purchase: someone actually completes their purchase.
- Lead: someone signs up to join your list, or whatever else you quantify as a lead.
- Registration: someone creates an account on your website.
Standard events can also be customized by adding parameters to standard events that define them further and help to specify conversion actions.
Custom Conversions
If you’re looking for more information, beyond what the standard Pixel events can give you, then you’ll want to create custom conversions as well. Custom conversions will help you get more granular with your tracking data. For example, instead of tracking purchases across your entire store you can specify tracking for a single product category.
In order to track custom conversions, you’ll need to first create a custom conversion, this will give Facebook more information about the event you’d like to track. To do this navigate back to your Facebook Ads Dashboard, then navigate to Custom Conversions, then click on Create Custom Conversion. Here you’ll enter all the details about the conversion event you’d like to track.
Adding the Pixel to Your Site
Now that you have an idea of how using the Facebook Pixel can help optimize your existing ad campaigns, it’s time to get it up and running on your site.
1. Create Your Pixel
Navigate to your Facebook Ads Manager Dashboard, here you’ll find a ‘Pixels’ option. Or, you can click this link.
![]()
On this page click on the button that says ‘Set Up Pixel’. Then you’ll have to name your Pixel and accept the terms and conditions.
2. Add the Code to Your Website
On the following page, you’ll be able to copy and paste the code, or use an integration to get the Pixel active on your site. Copying and pasting the code into your site is probably the easiest option.
![]()
To copy and paste the code all you’ll have to do is copy the code and paste it into theportion of your site, before the closingtag. The code that you copy will be based upon the specifics of what you’re tracking.
For instance, if you’re tracking a custom event, then you’ll have a different tracking code than the standard code.
3. Confirm the Pixel
Before you start using this data in your advertising campaigns you’ll want to confirm that it’s actually working. The easiest way to do this is to install the Google Chrome extension called Facebook Pixel Helper.
Once the extension is installed visit the page on your site where you’ve installed the pixel. If you’ve installed the Pixel correctly, then you’ll notice that the </> part of the code turns blue. If it isn’t working properly, then you’ll receive instructions as to how you can fix the Pixel.
In this case, the Pixel hasn’t been installed yet, so this is what we see.
![]()
Facebook Audience Breakdown
Facebook Audiences are one of the most important and useful aspects of Facebook’s advertising platform. Besides your actual ad copy, the audience you end up marketing towards will make or break the success of your advertising campaigns.
To get started choosing your audience just open up your Ad Manager and navigate to the ‘Audience’ section.
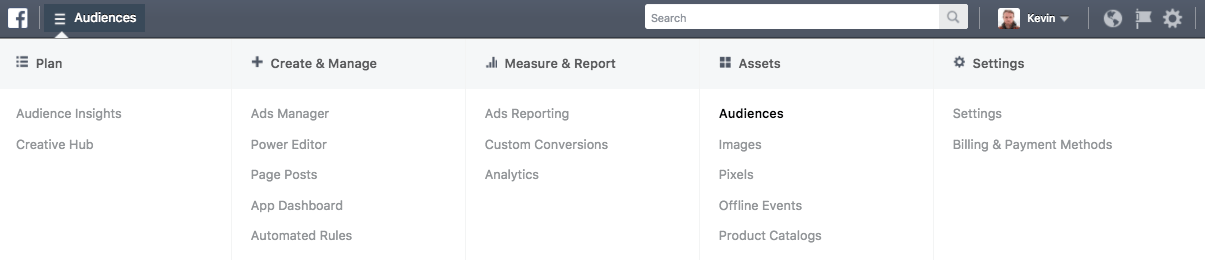
If you haven’t created a custom audience before then you’ll need to click on the ‘Audiences’ button. This will bring up a pop-up that will allow you to choose a few different audience types, shown in the image below.
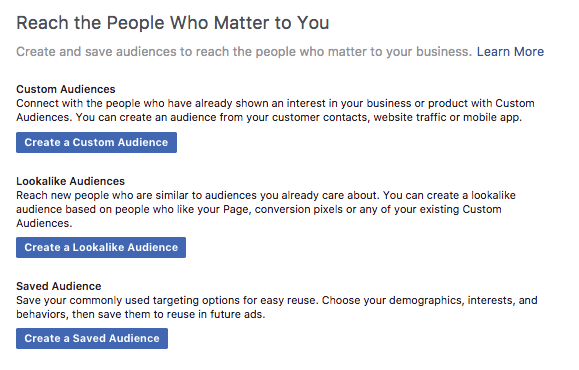
Types of Custom Audiences Available
There are tons of different custom audiences for you to choose from. Facebook is constantly increasing the audience types you can choose from on a regular basis. Some of the most popular audience types are highlighted below.
Standard Custom Audience
The standard custom audience option uses an existing list of emails, phone number, or Facebook user IDs that you’ve already collected. Note that this contact information needs to be given to you by the user via an optin or another format. You can’t just scrape this data from Facebook and begin advertising to that scraped group of users.
When you upload this list Facebook will then match this list to their existing database of users. Typically, they’ll be able to match around 70% of the contacts on your list.
To create a standard custom audience follow the steps below.
Creating a Standard Custom Audience
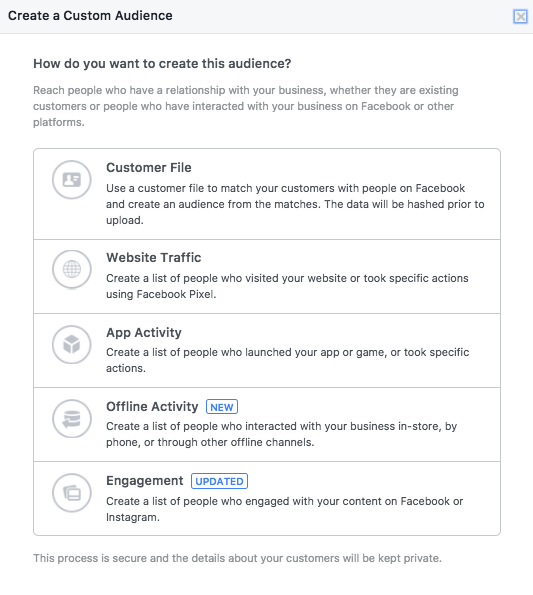
To create this kind of audience select the ‘Customer File’ option. This will allow you to upload your existing contact list. You’ll have two options to accomplish this.
1. Manually Upload Your List
Most likely, you’ll need to export your existing list of contacts. To do this you can open your existing email CRM and export the data in CSV or Excel format. Make sure that you only choose one data type as well. For example, you can’t create a mix of phone numbers and email addresses, it either needs to be entirely email addresses or entirely phone numbers.
2. Sync With Your Existing Email CRM
Facebook offers a tool called the Custom Audience Sync Tool. With this, you’ll be syncing your data between your email CRM and the Facebook ads platform. That way whenever leads join your email list they’ll automatically be added to the custom audience you’ve created.
App Activity Audience
App Activity Audiences are geared towards individuals or companies who are looking for more downloads, sign-ups, or app customers. This style of custom audience is one of the most popular forms of custom audiences.
You’ll be able to create audiences based upon the actions that people take when they’re using your app. For example, someone who hasn’t opened the app in the past week, or someone who’s left your app sitting in their cart without buying it. Currently, there are over 14 different actions you can target.
Creating an App Activity Audience
To setup this custom audience click on the ‘App activity’ option and select your desired targeting options. You’ll be able to designate ads based upon if certain actions are either taken or not taken. Some of the most popular options include:
- Someone recently completed a purchase
- Someone recently opened your app
- Someone recently completed a large app purchase
- Someone has reached a certain level in your game
Lookalike Audience
Once you already have a defined audience you can use lookalike audiences to expand your market reach even further. Lookalike audiences are only useful once you’ve established some sort of user or customer base.
Basically, Facebook will create an even broader market that shares similar characteristics or patterns with your existing audience. For example, you can target based upon interests, users, age, gender, and a lot more.
Creating a Lookalike Audience
Lookalike audiences are incredibly useful in that they allow you to reach users who don’t know you exist yet but are quite likely to actually become your customers.
To create a lookalike audience click on the (find where this is). Here you’ll be able to specify what you want your lookalike audience to base off of. Some common options include:
- An existing email list
- An existing custom audience
- Past customers
- App activity audiences
- Engagement audiences
- Website custom audiences
Website Traffic Audience
Website Traffic Audiences are similar to the standard custom audiences, however, instead of using email addresses or phone numbers to build your list you’ll be relying on website data that’s been collected via the Facebook Pixel. This is a great option if you don’t currently have any existing data to import.
Creating a Website Traffic Audience
To create a Website Traffic Audience you’ll need to install the Pixel on your site. If you don’t have the Pixel currently installed you can visit the previous section which will guide you through setting up and installing the Pixel on your site.
Engagement Audience
If you have an existing Facebook page, then you’ll be able to target people who have already engaged with you across Facebook. This option works for users who have engaged via both your Facebook page and your Facebook ads.
You have the option to engage with users who have interacted with you over the past year. However, the more recently they’ve been exposed to you the more effective your ads will be.
Creating an Engagement Audience
There are currently 4 different types of engagement audiences you can choose from:
1. Video
This engagement audience will let you create a custom audience of people who’ve either viewed your entire video ad, or even just a portion of your video.
2. Lead Ad
Lead ad engagement audiences will allow you to target people who might have opened one of your lead ads, but for some reason didn’t convert. You’ll be able to target them with another lead ad, or another form of ad.
3. Canvas
Sometimes you might be getting a lot of impressions, but still aren’t getting the kind of sign-ups you’ve hoped for. If that’s the case, then you can re-target people who’ve viewed, or even clicked, on canvas ads in the past but didn’t convert.
4. Page
If you’ve been getting a solid amount of Facebook Page likes, but aren’t seeing a ton of engagement or sign-ups, then you can actually re-target those same people.
5. Instagram Business
If you have an Instagram business profile, then you’ll be able to create ads for people who have interacted with your Instagram business page.
6. Event
If you’ve created Facebook events in the past, then you can re-engage these people with targeted Facebook ads.
With the page options you’ll be able to create a custom audience based upon the following:
- People who’ve engaged with your page, your page’s content, or even ads.
- People who’ve visited your page.
- People who’ve engaged with a post or ad, via comment, like, share, click, swipe, or reaction.
- People who’ve clicked any CTA text.
- People who’ve sent a message to your page.
- People who’ve either saved your page, or a single post on your page.
- People who’ve engaged with past events.
- People who’ve engaged with your Instagram account.
Household Audience
One of the newest developments for Facebook Custom Audiences is the Household audience option. This will allow you to target ads to an entire household, or towards the person in the household who makes the purchasing decisions.
For example, if you currently run an eCommerce shop that sells children’s toys it would be much more valuable to target parents, rather than the children themselves.
To learn more about marketing to a Household Audience, take a look at this recent article from Facebook.
How to Target Ads to a Custom Audience
The above information might seem like a lot, but once you’ve created a custom audience, targeting to that audience is relatively simple. Simply navigate to your Facebook Ads Manager or the Power Editor, and scroll down to the ‘Audience’ section. Then you can either select a custom audience you’ve created, or create one right from the editor.
You can even select more than one custom audience at a time. You’ll also notice an audience breakdown on the right that’ll give you some basic details about the custom audience you’ve selected.
In Closing
Facebook’s advertising platform is one of the best out there. We hope the tutorial above has been helpful in getting your first Facebook ad campaign up and running, while educating you on the ins and outs of the platform.
This platform continues to evolve and offer improved solutions for business and advertisers looking to expand their business, or remarket to past customers.
HOLY SH*T! You made it to the end.

Any questions related to getting your first Facebook ad campaign up and running? Ask away in the comments below. Need help scaling existing campaigns? Let’s talk!
Written By David Shiffman
David Shiffman is Co-Founder and Brand Elevater at Brandamos. A creative strategist with over 10 years of experience developing marketing strategies and guiding business development. An expert at translating brand objectives into creative strategies. Shiffman has worked with companies such as Paramount Pictures, Universal Pictures, Absolut Vodka and Bed Bath & Beyond.. His internet marketing strategies and execution have resulted in millions of dollars in revenue for clients and his personal experience gives an advantage in elevating brands both offline and online.